If you see anything you would like me to make for you please email me HERE


Monday 8 August 2011

Not a Card but a Present

Wow two posts in two days...  I'm even impressing myself!!

For those of you expecting a card - sorry to disappoint.  It's knitting.....


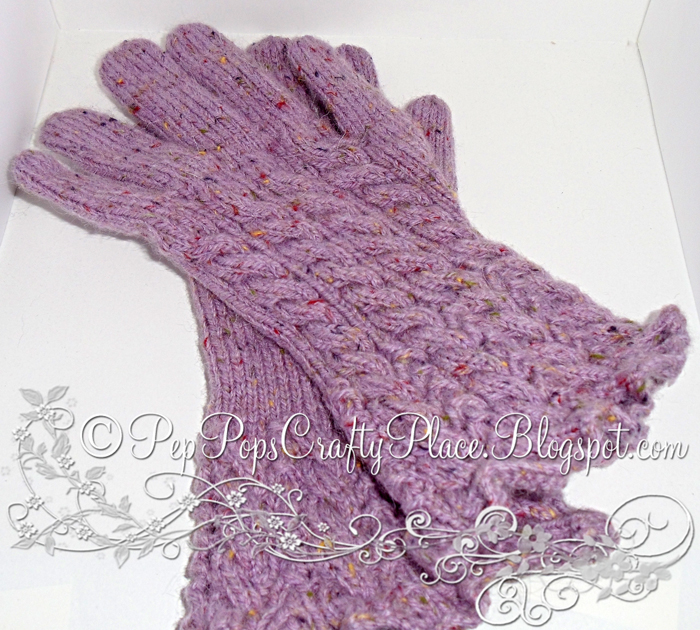
These were knitted for my bestest mate Gail for her birthday many months ago (told you all I had been busy but hadn't blogged anything)  If you want to see a card here's the one I made for her.

I've been knitting since I was a little kid and I usually have something on the go - at the moment I'm discovering socks.  I know you might all think I'm mad when I say this but there is something strangely comforting about knitting your own socks.

When I looked through my photos to see what I had to show you I found a picture of embroidered gloves and shoes that I took on a visit to the Burrell Collection.  If you're ever near Glasgow I can highly recommend a visit.  I thought I share a couple of my pics with you...


Aren't these incredible - if you click on the images you should get a bigger picture to see the detail.

I also found this picture and couldn't resist showing it to you...


This is Shadow peaking over the table at me - he likes sleeping on my chair and I think he was trying to tell me to move LOL.

I didn't mean to worry anyone with my last post, some personal stuff happened but the main reason for me not being about was my pc got a really nasty virus and it took months to get it fixed (huge thanks to Chris, my OH - he's a smart cookie).  We only got the last bit of it working yesterday.  Talk about withdrawal symptoms LOL.

Sneak Preview


I'm off for an early night, see you all again soon


Sunday 7 August 2011

Finding My Way Back with a Map

Hello there

I hope there are still some of you out there still reading my poor neglected blog.  I'm not gonna go into the details but a lot has been happening here but as everything has settled down and I've still been crafting so I'm back to  share some things with you.

My first post is a birthday card I made for my future FIL.  He loves to travel and loves old maps so this one was pretty straightforward.


I matted some old maps DP onto some black card, layered it and used some photo corners.  As usual I made a matching envelope. 

If you can see the detail on the circle map you'll see it mentions Australia - I thought this was appropriate as my future BIL lives there.

I promise you won't have as long to wait for my next post ... :)

Sneak Preview


Challenges Entered

Thanks for stopping by and I hope you had a great weekend.


Sunday 24 April 2011

Shades of Grey

Hello there,  I’ve just realised it’s been over a month since I posted anything on my poor neglected blog.  EEK! That’s one New Year’s Resolution out the window Sad smile

The thing is I have been really busy making things I just haven’t found the time to post them – so guess what, my blog is gonna be a bit like a bus stop… nothing for ages then they all come at once Smile

So, for starters… if you can remember waaaaay back to last month I showed you a sneak preview of something, well here it is…

Card-096

Card-097Card-098

Card-099

Card-100


This was a card (and matching envelope) made for the lovely (but ever so slightly mad) Gail’s birthday.  Please check out her blog and send her lots of squishy hugs.

I had a mad notion and decided that I would dig out my sketching pencils and colour the stamp with these and make it shades of grey.  I used Glossy Accents on her eyes to make them sparkle but that was about it. 

I really like the way this one turned out – in fact it’s one of my favourites.

Sneak Preview


DSC00401

Challenges Entered


Thanks again for stopping by and I promise I’ll be back soon Smile

Jaqui-Signature-for-blog-po

Tuesday 22 March 2011

It’s A Boy!

Hi everyone.  I hope you’re all well .

Well I finally bit the bullet and used one on my LOTV cute squares!  I thought it was about time, I mean I bought them in October at the SECC.  I can only “aaaw” over them so many times!

Chris’ friends have just become the proud parents of a bouncing baby boy, Ethan (love the name) and I figured this would be the perfect occasion for a cute square.  I wanted to keep it reasonable simple to emphasise the cuteness… what do you think?

Card-101

Card-102

Card-103

Card-104

Card-105

I’m liking the arty shots – especially as I can tilt them now too.  I’m also liking the envelope inserts – they are so easy to do but I think they look great when you see them with the card.


Materials


Sneak Preview

Card-095


Challenges Entered


Award


Now I need to say a huge thank you to Sue from Crafting with Sue who is very talented friend from the States, she’s an inspiration in many ways, not only does she make cards, she scrapbooks, she designs digistamps, and has the nuttiest parrots on the face of the planet Open-mouthed smile

So the rules are that I need to tell you 8 things about me…
  1. I learned Highland Dancing as a kid (as in Highland Fling, Sword dance type of dancing)
  2. I can’t do handstands cos I’ve got weird tendons in my fingers.
  3. I used to be fluent in Italian.
  4. I studied for a Maths degree and I’m a self-confessed geek.
  5. I love reading books.
  6. As a kid I poked a torpedo on a beach with a stick and thankfully lived to tell the tale.
  7. I’m ridiculously clumsy.
  8. I can pull a pint.

Now I get to pass this on to 8 people, in no particular order…
  1. Carmen – Whoopidoo…ings
I wish I could pass it on to you all.

Thanks again for looking and I’ll catch you later on in the week.

Jaqui-Signature-for-blog-po

Monday 14 March 2011

Exploding Birthday Box

Hi Bloggers.

I hope your Monday hasn’t been too stressful.  Tonight I’m sharing an exploding box with you.  This was a last minute request – boy was it a stressful project.  I was asked to make it on the Thursday afternoon and my friend needed it first thing Friday morning.  I warned Chris he may need to help with the sticking and feeding me copious amounts of coffee.  It was hard but I got there, but I do wish I had more time because I would love to have embellished it more.  Oh and don’t look at it too closely – it’s not as neat as I would have liked.  Ah well, next time…


Card-090Card-089Card-092

Card-094

It was a 40th birthday card, in case you’re wondering why it says Josephine 40.


Materials

Sentiment – sorry I still can’t remember where this came from but it was a downloadable freebie and inked round the edges
Letters – Dreamsfulfilled (I edited an I to make a 4 on Photoshop)
Sparkly beaded ribbon – LLB (this was a gift from the wonderful Trisha)


Sneak Preview

Card-101


Challenges Entered


Thanks again for visiting my little spot on the internet and taking the time to leave comments.  I really appreciate it. Have a great week.

Hugs

Jaqui-Signature-for-blog-po

Wednesday 2 March 2011

Light Box Tutorial

Hi there.  Hope you’re all doing ok.

I have been asked by a few people for a tutorial for my light box that I have made so as I had the afternoon off work I thought I would rustle something up.  I’ve used drawings that I did on Photoshop, I hope that’s ok for you all, because I didn’t have another cardboard box to chop up Smile

So, be gentle with me, this is the first time I’ve done something like this…

What you’ll need

  1. A decent sized cardboard box – it has to be big enough for your projects to fit in it with a bit of room to spare.
  2. Selotape.
  3. A sharp knife or scissors.
  4. Some bright white paper.
  5. Something sticky – I used double-sided tape but if you have patience then glue is fine.
  6. White tissue paper – this is optional
  7. A lamp – this is optional

Step 1

Make sure your box is closed and sealed tightly at any openings and if not selotape any gaps shut.

Lightbox-1

Step 2

Cut away the top and the front – the one’s that I’ve marked with an X


Lightbox-2

Step 3

You should now have a box that looks something like this.

Lightbox-3

Step 4

You now have to cover the insides with the bright white paper and make sure it’s stuck down really well with no gaps.

Lightbox-4

Optional Step 5

At this stage you can stick some white tissue paper where the top of the box used to be and then shine your lamp through this when taking your pictures.  The tissue paper helps to diffuse the light. (I didn’t bother with this)

To take your pictures

I finished my one at step 4.  So to take your pictures I place whatever I want to photograph inside the box and stand it on my kitchen worktop – I do it here because my lights in my kitchen are the brightest ones.  Try to angle the box so it’s under the light – this stops the sides of the box casting shadows – but if you have a lamp just stand this over the box so it shines directly into it. 

I have found I can still use a flash with my camera and it seems to work because it bounces off the white paper rather than what I’m trying to photograph.  I’ll be honest though and say when I get around to it I will by an angle-poise lamp to save messing about.

Hope you like my tutorial and didn’t laugh and my wonky pics too much Smile

Thanks again for stopping by and I hope you found this helpful.

Hugs

Jaqui-Signature-for-blog-po

Sunday 27 February 2011

Birthday Card for my Soul Mate

Hi there,  I hope you’re all having a great weekend. 

Today I want to share the card I made for Chris for his birthday last week.  As I was making this he was totally engrossed in his PS3 so the image was really appropriate.  I made the whole card while he was sitting about six feet away from me and was completely oblivious to it all until I put the envelope on the fire place LOL.  Please don’t look too closely at the colouring I made a bit of a hash of it in places but the printer is wireless and it doesn’t like the PS so every time I wanted to print something I had to ask Chris to save his game and switch it off… it wasn’t going down too well Rolling on the floor laughing  I would like to say a big thank you to Jennie from The Crafty Wife for her help with this card.

Anyhoo here’s the card – oh and he really liked it – SUCCESS!!

Card-086

Card-088
Card-087


I had to blur the writing in the arty shots – I hope you don’t mind, but I didn’t think you could take all the cheese Flirt male


Materials


Papers from Bon Scapatit Designs
Image Video Boy by Mo Manning
Sentiment from A Load of Old Bloglocks


Sneak Preview


DSC00379


Challenges Entered

Whoopsi Daisy Challenges – Someone Special (closed)
Double Dutch DDC#62 – Sketch It! (closed)
A Spoon Full Of Sugar #140 – Birthday Wishes (closed)
City Crafter Challenge Blog #45 – Nothing To It (closed)
Crafty Ann’s Challenge Blog #35 – Birthday Card CLOSED


Thanks again for taking the time to stop by and leave a comment.

Hugs

Jaqui-Signature-for-blog-po